
hash路由和history路由原理

面试vue开发时,面试官经常问:
- 请说下 vue框架路由模式有那两种.你肯定会毫不犹豫答出: hash路由和history路由
- 接着可能会问,它们两者之间有什么区别?你自信的回答到:
hash路由是利用hash值实现界面切换.
hash值是url地址#号后面的内容, 可以作为页面的锚点,实现一个页面不同锚点之间的跳转.
例如: 当从hash值为#a的路径切换到hash值为#b的路径时,界面会从a切换到b;
history路由是利用history对象putState方法或replaceState方法存储页面路径完成切换
history对象是浏览器历史记录对象
3. 大部份同学到这里可能就结束了,但面试官接着追问,能详细说下它们的实现原理吗?或者让你手动实现vue路由该如何实现?实际没想像那么复杂,我们来看看实现类似于vue框架hash路由:
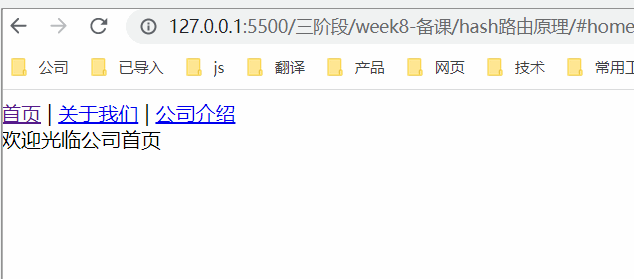
- 创建 index.html页面, 看注释应该能看懂, 与 vue 路由router-link组件和router-view组件作用相当
<body>
    <!-- 相当于 router-link -->
    <a href="./#home">首页</a> | <a href="./#about">关于我们</a> | <a href="./#introduce">公司介绍</a>
    <!-- 路由输出 相当于router-view -->
    <div id="router-view"></div>

    <script src="./js/router.js"></script>
</body>
- 创建 router.js 文件, 方便理解将 结构写来与vue 框架router.js类似
/**
 * 创建组件
 *   仅为一个div
 * @param {*} id
 * @param {*} text
 * @returns
 */
const importCom = (id, text) => {
	const el = document.createElement('div')
	el.id = id
	el.innerHTML = text
	return el
}

/**
 * 路由表
 */
const routes = [
	{
		path: 'home',
		component: importCom('home', '欢迎光临公司首页'),
	},
	{
		path: 'about',
		component: importCom('about', '以客户为中心,以奋斗者为本!'),
	},
	{
		path: 'introduce',
		component: importCom('introduce', '互联网知名企业'),
	},
	{
		path: 'notFound',
		component: importCom('notFound', '页面不能找到!'),
	},
]
/**
 * 添加路由,默认home
 */
const router = () => {
	const url = location.hash.slice(1) || 'home' // 获取hash值
	const rootEle = document.querySelector('#router-view') // 路由输出根节点
	rootEle.innerHTML = '' //清空原内容
	const childEle = routes.find(item => item.path == url)?.component // 查找路由组件
	// 添加路由组件
	rootEle.appendChild(childEle ? childEle : routes.find(item => item.path == 'notFound')?.component)
}

router() //初始化

// hash路由切换监听,hash值变化触发
window.addEventListener('hashchange', router)
- 到这里就已经实现了一个hash路由切换demo,你可以打到浏览器运行index.html 测试
- history 如何实现呢?我们直接看代码
- 新建 index.html页面
<body> <!-- 相当于 router-link --> <nav id='nav'> <a href="./home">首页</a> | <a href="./about">关于我们</a> | <a href="./introduce">公司介绍</a> </nav> <!-- 路由输出 相当于router-view --> <div id="router-view"></div> <script src="./js/router.js"></script> </body> - 创建 router.js 文件, 与hash router.js大部分相同
/**
 * 创建组件
 *   仅为一个div
 * @param {*} id
 * @param {*} text
 * @returns
 */
const importCom = (id, text) => {
	const el = document.createElement('div')
	el.id = id
	el.innerHTML = text
	return el
}

/**
 * 路由表
 */
const routes = [
	{
		path: 'home',
		component: importCom('home', '欢迎光临公司首页'),
	},

	{
		path: 'about',
		component: importCom('about', '以客户为中心,以奋斗者为本!'),
	},
	{
		path: 'introduce',
		component: importCom('introduce', '互联网知名企业'),
	},
	{
		path: 'notFound',
		component: importCom('notFound', '页面不能找到!'),
	},
]
/**
 * 添加路由,默认home
 */
const router = () => {
	const url = location.pathname.slice(1) || 'home'
	const rootEle = document.querySelector('#router-view')
	rootEle.innerHTML = ''
	const childEle = routes.find(item => item.path == url)?.component
	rootEle.appendChild(childEle ? childEle : routes.find(item => item.path == 'notFound')?.component)
}

//事件委托给a标签绑定事件,监听切换
const navEle = document.querySelector('#nav')
navEle.addEventListener('click', function (e) {
	if (e.target.tagName == 'A') {
		e.preventDefault()
		const href = e.target.getAttribute('href').slice(1)

		history.pushState(null, `页面标题`, href)  // 相当于 push
		// history.replaceState(null, `页面标题`, href)  //相当于replace

		router()  // 这里不要忘记执行
	}
})
- 新建 index.html页面
- 路由模式除了以上两种还有memory模式 , 这个在react框架是不否见过呢!1、优点适合非浏览器不需要url路径,可以不依赖网页
无需刷新页面
2、缺点
适用场景少,通常在app中使用
只对单机有效
无法实现分享等需要使用url的功能
不支持浏览器前进后退
3、原理
使用本地存储localstorage,对路径进行存储 , 上面 history模式实现,存储路径换成localstorage就完事。
- 相关阅读: 两种前端路由(hash模式和history模式)实现原理解析及区别
转载请注明来源:hash路由和history路由原理
周sir
这家伙很懒,什么都没写!
你可能也喜欢

前端文件流、切片下载和上传:优化文件传输效率与用户体验

Docker-Compose发布与部署

制作自己的镜像
Docker 快速安装软件


